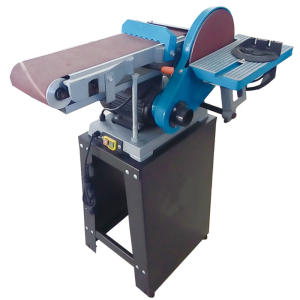
belt grinder
Common Belt Sander Problems and How to Fix Them?

Oct
Are you thinking of spending your money on a multiuse tool that can provide a better trimming experience and sanding the rough area in your garden? Well, Belt Sander can be the best problem solver in this case!
Either you’re leveling up the gardening area or having spare time as a home hobbyist; you can use the highest quality of Belt Sanders to create something impressive. But machines do come with some technical problems!
Yes, you heard it right!
A Belt Sander can offer several technical and mechanical issues when you’re operating it to trim or shape out your garden. Recurrent belt breakdown, inconvenience in the removal of stock, and issues related to tension pressure can disturb you a lot!
But don’t worry now. We have spent our hours collecting the common Belt Sander problems and handy tips to solve such issues in no time. So let’s dive into the content and explore helpful tips.
What Should You Do Before Using Belt Sanders?
You’ll find Belt Sanders as one of the most valuable and helpful tools in the gardening industry. Almost all hobbyists, gardeners, and manufacturers love using this tool because of its speedy working mechanism and ease of use.
But don’t you think there are many things to look for when you’re operating a tool for the first time. Similarly, when you are using the reliable quality of Belt Sanders, even for the first time, many things need to be done before using them.
Using multi-tools for shaping up your garden seems like a full of fun task, but the experts suggest not continuing it if you have not completed the prior tasks.
You can use Belt Sanders for a wide variety of actions such as sanding, rounding, free-hand shaping of your gardening area. Regardless of the precise sanding sections, there can be many more parts that can cause inconvenience during working.
That is why it is highly suggested to follow the given tips before using the Belt Sanders:
· Read the Machine Manual
Almost all multiuse machines are available with a handy manual that helps the users to get a better insight of the machine’s specifications. The Belt Sander is also available with a detailed guide about every property of the Belt Sander.
Make sure you read that manual in detail. Some manufacturers also embed pretty helpful tips to operate different types and modes of the Belt Sanders. The primary reason behind the availability of various procedures is to ensure ease of handling.
So our experts suggest reading the Belt Sander’s manual in detail to get a better idea of the method by which it can be operated without any inconvenience.
· Understand the Instructions
Getting a brief understanding of the Belt Sanders before using it is one of the most critical steps when you think of using this tool for gardening or shaping your green area around the house.
The operation, shut on and off button, ease of control, and many other actions are directly related to the number of detailed instructions present in the manual. The majority of the gardeners and manufacturers follow all the instructions mentioned in the manual before operating.
Any gardening tool or machine comes with a long list of instructions that make it easy for the user to experience a better working time. Thus, if you want to waste your time doing experiments on its operation, make sure to follow all the detailed instructions mentioned in its manual.
· Get an Idea of the Applications and Limitations
Different manufacturers provide versatile Belt Sanders for varying applications. However, most of these Belt sanders are used in gardening, trimming, wood cutting, sanding of rough surfaces, and other similar processes.
Thus, the application for each model and the size of the Belt Sander varies. That’s why it is preferred to look for the simple applications of this fantastic tool before heading to use it in your garden. There may be a bundle of tips for each application of the Belt Sander.
Thus, don’t forget to check the suitability of the Belt Sander with the mechanism or the task you’re trying to perform. Furthermore, there are many common limitations for the use of each model of the Belt Sander.
You must keep in mind the operational limitations of your tool before using it to complete your task. In addition to this, make sure about the environmental and working conditions when you’re using this tool. The primary reason behind taking care of the working conditions is because the limited working scenario can change the efficiency of your Belt Sander.
One thing to hear: Don’t even dare to use this multiuse tool in conditions that can limit its working time and efficiency. For doing so, you can read the manual and the applications present in the manual
What Safety Procedures Should You Follow When Using Sanders?
Almost all Belt Sanders are compelling when it comes to operating it at the beginner level. The majority of the users use them to treat the rough surfaces or create a fine finish of the wooden objects. Some also imply them in the gardening field where they the sanders to create different gardening objects.
However, regardless of the usage of the Belt Sander, there are many safety tips that you need to keep in mind while using it. Some of these safety tips are listed as under:
· Use Wear Impact-Resistant Eyewear.
The eyes are one of the most sensitive organs exposed to dust whenever you are using a Belt Sander. That is why the manufacturers and the operators suggest wearing the premium quality of wear impact-resistant eyewear whenever you use it.
When using Personal Protective Equipment (PPE), wear an impact-resistant eyewear stand on the top. As described earlier, using a Belt Sander or any other tool like this can produce pointed chunks of wood that can damage your eyes. These chunks are generally released in the air when this multipurpose tool is used.
Thus, what would happen?
Without properly adjusted impact-resistant eyewear, a user can suffer from severe eye injuries, thereby leading to vision loss in some cases. Thus, make sure to avoid such harsh circumstances by using reliable and compatible wear-resistant impact eyewear.
· Inspect the Belts and Discs
It is mainly preferred to inspect the working of a new tool before experimenting with it on the targeted item. A similar case is with the Belt Sander. Make sure to test the working of the belts and discs of the Belt Sander before cutting or trimming any material with it.
The primary reason behind inspecting the sander’s working of the belt and disc is to get a brief idea about its working mechanism. While inspecting the belts and discs, make sure that both these parts are intact and are not damaged from any side. A slight odd point in the belts and discs can cause inconveniences during its working.
And you know what?
The core reason for inspecting the Belt Sander before using it is to ensure that its discs must be placed in the correct position. They should not be loose because the power action of the Belt Sander can cause them to separate, thereby to lead to accidents during its use.
· Keep Your Hands Away
Hands are one of the most exposed body parts to Belt Sander after eyes. The sharp blades integrated into this multipurpose tool can cut your hands in no time. Thus, the experts suggest keeping your hands away from the belt when you are handling it.
It sounds like common sense to keep your hands away from a sharp object when keeping it in your hands. This safety tip can save you from a large number of mishaps during the operation of the Belt Sander.
In addition to this, there is a suitable distance between the sander and the hands is mentioned in the manual. Thus, make sure to read the distance parameters and try to maintain them for the safe operation of this fantastic tool in your backyard or garden.
· Keep a Dust Collection System
Are you worried about the mess created using a Belt Sander in your house or garden? Don’t worry! We have also brought a solution for this. Many dust collection systems help the workers keep the dust and dirt particles in a box in the market. This makes them save their time during the working of the Belt Sander.
There are many models of this sander that are now available with innate dust collectors. You can purchase a filter bag or a vacuum to use as a dust collector along with the Belt Sander. Thus, now you don’t have to worry about cleaning the mess after using the Belt Sander.
An interesting thing!
By using a dust collector, you can also protect the motor of the Belt Sander. The operation of the Belt Sander on the wooden material can cause particulate matter that can be integrated with the inner parts of the motor. Thus, the accumulation of dirt in the motor can lead to the low efficiency of the tool.
What Should You Avoid When Using Sanders?
The quality of sanding shows your dedication to your task. Many vertical and orbital sanders are used to smoothen the rough surface of the wood and other material. But you have to avoid many mistakes and actions while using sanders, even for the first time.
Using a good technique and avoiding mistakes while handling this multipurpose tool while treating the grounds. So make sure to avoid the following mistakes while handling Belt Sanders.
· Don’t Put Too Much Pressure.
It’s undoubtedly too hard to obtain a cutting-edge finish from the abrasives while you are sanding them. But that doesn’t mean that you start putting too much pressure on the sanding machine. When you put excessive pressure on the Belt Sander, it may feel like you are finishing the process in no time, but this is not true.
The application of excess pressure on the Belt Sander can ultimately cause many technical problems, including swirls, uneven sanding, lack of accurateness, and other consequences. Thus, the manufacturers advise putting moderate pressure on the Belt Sanders while treating the rough surfaces.
· Don’t Use It on An Angle.
The majority of the users consider Belt Sanders as the angle grinders while using it to smooth a rough surface. But the fact is that the disc or the flat sheet integrated inside the sander is not an angle grinder. It can’t perform its best when you use it on an angle.
In addition to this, when you use a Belt Sander on an angle, you are not handling it in the right place. In such a way, you’ll end up sanding one area more than the other. Thus make sure not to use an angle when using a Belt Sander to treat or trim a surface.
Some other things you need to avoid while using Belt Sanders are:
- Don’t try to use the exhaust system while operating the sanders
- Don’t operate the sanders unless it is not adjusted correctly on the substrate
- Don’t use thin or small substances or surfaces to integrate with the Belt Sander
- Don’t use the Belt Sander unless it is properly adjusted

Machine/ Abrasive Maintenance Issues
There can be many more issues for the maintenance of the Belt Sanders because they need a good look after when you are using such tools. However, each of these issues is available with flexible solutions that you can implement to get rid of the overwhelming consequences.
Thus, after comprehensive research, we have listed some of the standard machine or abrasive maintenance issues that you may face during the use of this machine. Some of these common issues are listed as under:
Incorrect Belt Tracking
The belt’s position in a Sander is one of the most crucial factors that can affect its working in undefined ways. When the belt isn’t placed correctly, it can cause the rollers or the machine’s discs to slide off the track during its working.
There can be a large number of reasons which are responsible for the improper tracking of the belt in this multipurpose tool. These factors include:
· Blocked Path of the Laser Eye
One of the primary reasons that lead to the incorrect belt tracking on the Belt Sander is the blockage of the laser eye. Thus, the users must clean the laser eye to make it free from dirt and dust particles to avoid this inconvenience.
· Storage of the Abrasive Material
Another reason that promotes the misleading tracking of the belt in this multipurpose tool is the excessive storage of the abrasive material in the storage bag. Many storage bags are integrated with the Belt Sanders, making it tricky for the belts to perform.
Furthermore, the belts are hung on, and the sanders can’t be stored on the floor, particularly the concrete one. Thus, a large amount of dust present in the storage bag can decrease the working efficiency of the belts.
Dust Or Dirt Buildup with Static Electricity
The excess accumulation of dust in the machine can cause problems in its working efficiency. It has been observed that the dust buildup in the Belt Sanders can cause severe operating issues in this too. Moreover, dust accumulation is also related to the problem of static electricity or the inadequate flow of air in the machine.
Besides this, many other reasons can aggravate the dust accumulation in the machine. Some of these boosting factors are listed as under;
· Climate Problems
The climate around your sanding area can profoundly impact the static issues of the electricity needed to run the Belt Sander. Thus, manufacturers prefer using this device in a climate with low humidity.
This will make the flow of electricity more conducive towards the Belt Sander, thereby helping it perform better. Thus, if you want to get rid of the static electricity problems in the Belt Sander, make sure to use it in the raised temperature of your shop.
· Troubleshoot This Problem
One of the most impressive ways to troubleshoot the presence of static electricity or dust accumulation in the Belt Sander is by inserting the dust extraction system into it. If you don’t want any clogs to happen in the working mechanism of the gardening device, you have to maintain a steady airflow in the machine.
Thus, the availability of a constant airflow with moderate temperature will solve dust storage and static electricity concerns.
Belt Turning or Overloading
Another primary reason for the maintenance issues of the abrasives or machines is too much loading. This factor can lead to the recurrent replacement of the belt, increasing the overall cost for operating Belt Sander.
Thus, the excessive loading on this amazing sanding machine can leave non-reparable marks on the surface that you want to sand. Unlike all other issues, there can be many reasons which lead to the belt turning. Some of these factors are:
· Damaged Belt
One of the most common reasons for overloading the Belt Sander is the presence of the worn belt in the machine. Plus, overloading can also cause the belts to tear more than usual, leading to the frequent replacement of these belts.
· Incorrect Storage of the Abrasive
A core reason for the overloading of Belt Sander is the incorrect storage of the abrasive. You can prevent this problem by hanging up the belts before integrating them into the machine. This will make the device soak up all the moisture and avoid losing its shape.

A Broken or Damaged Belt
If your Belt Sander has a frequent breakdown level or short lifespan, there is probably a reason related to the broken or damaged belt. It is not only associated with the damaged belt; it can also lead to many other consequences such as tears, frayed joints, and broken joints in the belt of the Belt Sander.
Thus, if you are experiencing frequent belt breakdowns in your machine, it’s high time to search for the core reason behind this inconvenience. Don’t worry, some of the following reasons can be the reasons for the broken belt.
· Excess Loading on the Machine
One of the recurrent causes of the frequent breakage of the belt in sanders is excessive loading. The accumulation of the foreign particles in the storage box of the machine can be the primary reason for the breakage of the belt.
The manufacturers suggest the users make sure that all the workpieces are of the same thickness, and all machine parts must be dirt-free when you are ready to run this machine. Thus, you can avoid this problem by taking a brief account of the grit sequence in the machine. You can check this factor while integrating this machine with your application.
· Bad Joint of the Belt
A faulty manufacturing process or an incorrect joint of the belt in a Belt Sander can weaken the machine’s efficiency and lead to the frequent power failure of the equipment. You can also prevent this inconvenience by checking the preventing the premature belt joint in the recommended direction of the belt.
Furthermore, you can also use some high-quality bidirectional belts since they can provide you an ease to run the machine in both directions. But, if you are using a unidirectional belt, make sure that the working direction of your machine is proper.
Wide Belt Sander Visual Defects
Besides all the mechanical or technical defects, your Belt Sander can have many visual defects, which ultimately lead to less efficiency of the sanding machine. You can identify such defects visually.
We have observed many of these defects among users all around the world. However, some common visual defects in the Belt Sander are listed as under:
Chatter Marks
Some Belt Sanders are expected to create chatter marks or lines on the workpiece when you use them to sand the rough surfaces. But time is not always the answer for creating chatter marks. It is one of the common visual defects you can observe in the Belt Sander if you use it for a longer time.
There may be many other potential reasons responsible for producing the chatter marks on workpieces when you are using Belt Sanders on them. Some of these causes include:
- Chatter marks can also be a result of the worn contact rollers in the Belt Sanders
- Frequent use of an incompatible roller in the sanding machine can also cause chatter marks on the workpiece
- You may have incorrectly adjusted the joint of the belt, which can ultimately lead to the creation of chatter marks
- You can use a roller and a typical belt formula to diagnose this problem
- An increased or wring tension pressure on the working area can also produce chatter marks
Ridges
There are many possible chances that you may have observed ridges on the workpieces. Thus, we have now introduced many impressive methods that can help you get rid of these patterns in the ridges. Some common reasons that can cause bumps to appear on the workpiece are:
- The application of high sanding pressure on the machine
- Low speed of the working machine’s belt
- The stock removal must be too high
- A slight clogging in the belt
- Poor dust extraction from the storage box of the machine
- Improper cleaning of the storage box of the Belt Sander
Scratches or Grooved Lines
Have you ever observed scratches or grooved lines on the surfaces that you are thinking of sanding with a Belt Sander? If yes, you don’t have to worry; this is a common visual defect in such machines. However, scratches or grooved lines are pretty similar to the ridges.
Some root causes for the occurrence of scratches and grooved lines on the workpiece while using the Belt Sander are listed as under:
- Cracks must be present in the abrasive coating of the machine
- Presence of a dashed line along with the length of the piece
- Contamination of the pressure beam in the Belt Sander
- Contamination of the graphite cloth
Wavy Surfaces
No doubt, the primary reason for using a Belt Sander is to promote the smoothness of any surface, but many hobbyists and gardeners have observed the wavy textures on the workpieces. There can be inconsistent peaks and valleys on the surface you are trying to sand with the Belt Sander.
Similar to all the above mentioned visual defects, the occurrence of the wavy surfaces on the Belt Sander can be due to the following reasons:
- The increased softness of the roller in the application
- Excess loading on the belt of the sander
- Incompatible comparison of the grit in the machine
- High sanding pressure on the surface and low removal rate
Final Words:
Being a gardener or a person who wants to renovate things most regularly, the Belt Sander can be an essential tool. But if you’re afraid of using it because of its operational problems, the above guide can help you a lot. Read the issues and their troubleshooting tricks above and enjoy handling the Belt Sander with full grip.