belt grinder
Belt Sander Guide: All You Need to Know
Oct
Shaping and molding the materials as desired is a long-term business all around the world. People want to attain the things done in the shape they want, so the business market keeps producing and supplying the equipment that fits the requirement of industries to ease them in their work.
Belt sander, all you need to know is if you belong from such industrial background and are peeping for an object to give a proper shape to your materials and make surfaces smooth, sharpen, and shape them. A belt sander is a unique wedge type of equipment as, unlike other varieties of machinery, it is not massive to carry and operate.
The belt sander is nowadays getting such a good reputation all around the market as people are very keen to purchase it. So let’s just start from what a belt sander is. This article is the exact point where you will get the full description of the belt sander starting from its brief, continuing along with the things you need to know while purchasing it, tips to use it, and the safety measures you need to follow using.
What are belt sanders?
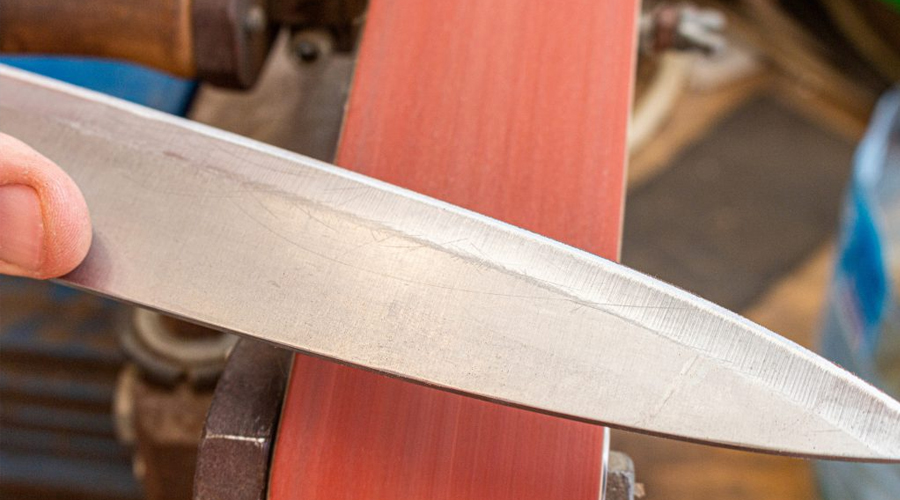
A belt sander is usually referred to as a strip sander, which is the equipment used to level things, for instance, wood. It can also be used for mending different facets.
A belt sander is a very suitable instrument that is often manipulated to equal up a rough surface and abolish edges when a smooth surface needs to be established.
A belt sander can be mentioned as a machine as it helps in building the surfaces quite slippery and fettle the things and many materials as they are demanded to be, such as those made up of wood, marble, etc.
What is the contrast between a belt sander and a belt grinder?
Belt sander:
A belt sander is the epitome of machinery that level out the surfaces and gives them a sharp and balanced look by ending the edges on the toping.
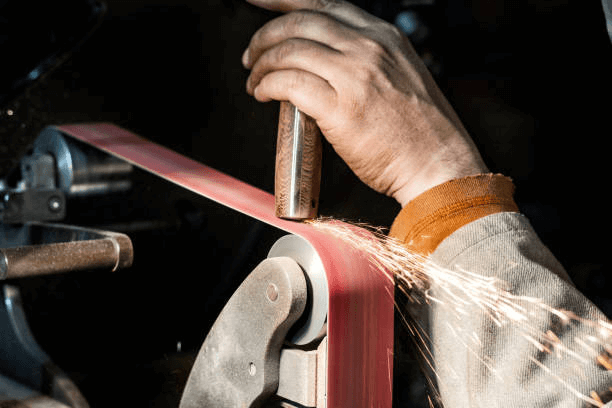
Belt grinder:
A belt grinder is a speeder that works swiftly and puts off all the unwanted bulk of stuff from the surface of the industrial legacy to give it final mien.
Belt Sander VS. Belt Grinder( Difference)
Difference 1.
A belt sander helps scour up the grove material and products.
A belt grinder is useful in topping the alloys the way they are a prerequisite.
Difference 2.
Belt sander level the facet and substance gradually by turning it into a very sharp desired look.
The belt grinder is maneuvered when things need to be done within minutes by quickly removing the mess over them.
Difference 3.
The belt sander’s belt is modeled in a way that helps it to rotate well as this kind of belt is easy to accomplish the toil of the belt sander.
The belt grinder’s belt is made up of rigid and solid metals that help it to easily grind things the way they are required.
Difference 4.
A belt sander is brought into play to eliminate unwanted metals and extra gubbins from the counter of a wooden thing usually.
Belt grinder is designed for industries as it grants a final gape to the industrial brand and helps them look quite sharp.
Difference 5.
Belt sander gives the product an easy and very smooth look.
Belt grinders make things look razor-sharp.
Difference 6.
Belt sander labors very slowly as it makes things smooth, so it works at a slow pace.
Belt grinder is a sprinting machine in a way, as it quickly rushes out the belt of unrequired things and sharpens the plane.
Difference 7.
Belt sander has the ability to fine the surfaces and makes them even.
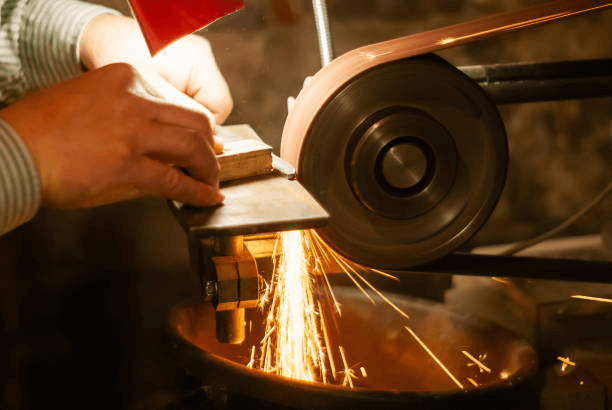
You can utilize a belt grinder in cutting some rigid and riding bodies.
Difference 8.
Belt sanders are operated for giving a delicate shape, leveling the top areas, and burnishing them.
You can operate a belt grinder for various purposes as it can give the objects both an exact shape or a harsh one, can cut the stuff, and some also allow for polishing the entities.
Difference 9.
A belt sander can slog on easy-going objects that are cheesy to act on, such as wood or polymers.
Belt grinder is practiced for many materials as it is applicable on metals, polymers, timber, concrete materials, and stones.
Difference 10.
Belt sanders are manipulated for woodworking.
These are utilized in industries as they cost high.

What should I look for in a belt sander?
Before buying any product or a thing of usage, there are some essential things we need to scrutinize to have the perfect one. You might be procuring a belt sander for the first time and may need to know all the critical features you need to put a glance on. So if you ought to put your money into procuring a belt sander, all you exigence to know are some essential features to let your money go effective in the future.
These features on the top comprise the significant size, the manner the belt sander is built up, the speed of the belt, and the outline of the tool. The other characters that are necessary to buy the craved belt sander are its dust collection potential, the variability in rate, and the last if the product feels easy to clench in hand and use or not.
Belt Sander Size
The most commonly used belt sizes for belt sanders are:
- 1 x 30 Grinders
- 1 x 42 Grinders
- 2 x 42 Grinders
- 2 x 48 Grinders
- 2 x 72 Grinders
- 3 x 18 Grinders
- 3 x 21 Grinders
- 4 x 24 Grinders
- 4 x 36 Grinders
- 6 x 48 Grinders
Among these all, the most commonly used belt size for a belt sander is 3 x 21 but you can still choose another better option depending on your project size.
Belt speed
Not only does a single factor affect the speed of the belt in a belt sander. Several elements will cause the speed to change accordingly. These append the material being operated on, the grade of pebbles, etc. But still, keeping these all characters in an average, the normal speed is three thousand Surface Feet Per Minute (3,000 SFPM).
Other than this adequate speed, the buyer must know how to sustain discrete speeds for unalike stuff, grades, and in addition grains.
SFPM
SFPM is abbreviated for Surface Feel Per Minute, which shows up the tempo of the belt horizontally with each foot per minute. The belt’s speed and cutting rate are directly proportional as the cutting rate will increase with an increase in the belt’s pace, and the fragmenting rate will decrease with the decrease in the sprint of the belt.
Every material has a different speed that will best suit it, and it can be calculated from the formula: SFPM = RPM x .262 x Tool diameter.
For instance, if the measurements of the belt for your belt sander is 3 x 21 with a motor of 2100 RPM with a 6″ drive wheel, the speed can be calculated as (2100 x .262) x 6″ = 3,301.2
So you can calculate the speed rate for your sander’s belt by using this formula. There is an average table that you can check from websites showing you the whole table of speed for variant statistics such as those for plastics is 1920 to 3540 and those for timber is 2940 to 4920.
The belt speed must be kept calculated. Otherwise, it may damage your belt sander’s cutter clearance, belt, and heat and pressure control.
Variable speed
The variability is significant for belt sanders as the speed needs to be administered, increased, decreased, or managed according to the project’s demands. On the same piece of the material, some spots may require a high speed, but the others may require a low one, so a fluctuating rate of a belt sander is the primary feature that aids to do things well. It helps you use it quickly and control the number of rotations of the belt by a fingernail.
Motor size
The motor size varies, and it also depends upon the belt size the belt sander has. Different belt sanders perform best with varying sizes of motors.
Dust collection
Dust is very irritating, and when it is about a belt sander, it creates so much dust in just seconds, and your whole working area will be dirty. So a dust collector is an essential component of the belt sander. While acquiring a belt sander, keep it especially in your mind to purchase that one belt sander that fits best to your vacuum cleaner so that all the dust gets removed quickly. Usually, small dust collectors can not collect the whole dust, so you must check the dust collector before picking it from the shop.
How to use a belt sander?
Step 1: Goggles and Mask
Before starting your work, scour a mask that helps you with anti-dust ventilation and use goggles for your safety terms.
Step 2: Material clasping
First of all, hold and fix the stuff that is required to make it smooth. Fixing it will assist you in working efficiently without the worry of dropping it.
Step 3: Boot up the sander
Now the sander should be booted up, and the motor should be driven at the speed you calculated for your device.
Step 4: Adjusting hands
For a working balance, the hands must be located so that one is set on the trigger stands and the other on the frontal stand to support firmness.
Step 5: Move continuously
Put the crimper towards the timber and let it strop the wood better by making them contact continuously and motivating the appliance is a ceaseless thing needed during the procedure to flat up the whole material. Throughout the process, please keep checking in regular intervals to know the posture of the material and trigger it when the desired point is achieved.
Step 6: Closeout
Once the procedure is complete, take away the material from the working table and deposit the next one that is required to fine up and repeat the activity.
Belt Sander Cautions
Before pulling the trigger tips:
Operating a belt sander is an easy thing to do, but still, if you are using a first-time user of a belt sander, there are some cautions you need to stick to for your protection. Operating a belt sander is an art, and it requires nothing but just experience, so after practicing it at a random time, you will learn to employ all the attributes of a belt sander quite well. The safety tips while using a belt sander are:
Tip 1: Use proper eyewear
While operating a belt sander, the thing you need to go with for your safety is just eyewear that might be a goggle. It is necessary as, during the buffing process, the cutting material is so harsh that it starts blowing its pieces into the air. Often, they go directly driven into the workers’ eyes and cause severe injuries and health issues. So wearing goggles is the first safety tip you need to follow.
Tip 2: Dust Collection
The procedure is quite polluting as it may spread away from the dust around the working point, and the workers may inhale it, so using a dust collector is the best thing to be done while using a belt sander. It will prevent both pollution and health hazards to workers.
Tip 3: Both hands in use
Working with both hands is necessary to manage the machine balanced in your hands. The hands should be adjusted so that the first one is placed on the trigger button and the other on the frontal stock to ensure safety.
Tip 4: Stay protected from the belt
A belt is damaging if your body’s parts go near it, so while working with a belt sander, be sure to keep your hands at the right distance from the belt and operate it carefully.
Tip 5: Disc and belt review
The discs and belts belonging to a belt sander are two essential components and must be examined before use. The belt must be tight and at the right place on the belt sander to start work, and the discs should be firm and subtle. If the belt is loose or the disc is mangled, avoid working with the belt sander until your equipment is not repaired and able to use again.
Tip 6: Power supply disconnections
While a break from work of belt sander, or changing the stuff on the table, or changing the sander belt, or collecting dust, be sure to disconnect the power supply to make possible safety.
After pulling the trigger tips
Tip 1: Continuous movement
Moving the belt sander continuously after pulling the provoke switch is essential for the safety of the belt sander and the worktable stuff. If the belt sander is kept just only on a single point, it will for sure create a hole in that place, and even the belt or discs may go burnt or get damaged. So interacting with the belt sander moving on the material is necessary.
Tip 2: Sander is the actual worker
You may not need to put pressure on the stuff as the belt sander is built up for this purpose. It can better do this task of pressurizing where it is required. So don’t take unnecessary burdens and stay easy while the sander is finishing the desired work.
Tips 3: Side to side and forth to back
Please don’t move the belt sander on the same point repeatedly. Set a whole cycle by moving it from one side to another. Then from the front to the back so that the entire material is obtained even.
Tip 4: Take start from the glassy surface
Don’t directly start the belt sander to move on the roughest edges. Start from the even points where the counter is a slight flush and then direct it towards the edges to maintain a proper work temperament.
Maintenance of the belt sander
To maintain a product purchased is more important than using it because if you do not care for its maintenance, it will get damaged, and you for sure will have to put your money again into buying a new one. So similarly, maintenance of a belt sander is also essential. Here are some features on which you must keep an inspection regularly to keep your belt sander working deftly.
Maintaining the belts
Belts are the primary functional tool of a belt sander, so taking good care of these belts is essential. You should not tie the belts on the pulley once the belt sander is done operating. Allow the belts to be loose when the belt sander is not in use. Belts ought to be held neither tight nor loose as in both situations. You may harm the belts.
Wheels maintenance
You should keep wheels away from the floor when the belt sander is not operated, as it can leave marks, and keep the wheels away from garbage around as it can affect the belt sander.
Looking at the belt sander plug
You should not unfold the plug wire as it may get into water or other materials that can damage its working. So You should pay attention to avoid any trouble in working of a belt sander.
Dust collector precautions
Do not press the dust collector while it’s connected with the belt sander, as it will affect the functioning of a belt sander. If the dust collector needs to be emptied, simply detach it from the belt sander and then remove the dust from it.
Final Thoughts
This article gives you complete information about the best tools for performing multiple tasks, such as belt sanders. After reading this information carefully, people will be able to make better use of this tool. It is a kind of handy necessity that helps you with your woodworking tasks.