main
How to Make a Lawn Leveling Rake
Feb
Are you tired of looking at your lawn and seeing a bumpy, uneven mess? Don’t despair! With a simple DIY project, you can make your lawn leveling rake and transform your yard into a smooth, even surface. Using a yard leveling rake is a cost-effective way to improve the appearance and health of your yard without having to hire professionals or invest in expensive equipment. In this article, we’ll provide a step-by-step guide on making your lawn leveling tool using materials that are easy to find and affordable.
With our simple instructions and some elbow grease, you’ll be able to level out your lawn in no time and enjoy a beautiful, healthy yard.
In this article:
What To be Aware of When Making A Lawn Leveling Rake
What Tools and Materials Will You Need for a DIY Lawn Leveling Rake?
How To Make A Lawn Leveling Rake
Things to Note When Making a DIY Lawn Leveling Rake
What To be Aware of When Making A Lawn Leveling Rake
A lawn leveling rake is a valuable tool for smoothing out uneven surfaces on your lawn. Making your own can save you money and allow you to customize it to suit your standard golf-level yard. However, before you start making your lawn rake leveler, there are a few things to hold onto to ensure your project is successful. Here are some key considerations:
- Your Lawn’s Size: Your lawn’s size will determine the rake’s size for you to make because it’ll determine how effectively you can level the entire area. For instance, it is advisable to make a small lawn leveler when leveling a small yard and a large rake for a large yard as well. This is because using a small rake for a large lawn will take longer, while using a large rake on a small lawn will make it difficult to maneuver around. Consider the rake’s handle length and the width of the head. You want to ensure it is comfortable and will cover the necessary area.
- The contour of your lawn: If your yard has a lot of hills or slopes, you may need to adjust your rake to accommodate these contours, as these features may affect the effectiveness of the process. For example, you may need to narrow the rake’s Pronged head or change the angle of the tines. Ultimately, considering these helps to promote plant health, improving drainage, and add to the overall curb appeal of your home or lawn.
- The Rake’s Weight: A heavier rake may be more effective at leveling bumps and dips but may also be more challenging as it’ll be difficult to maneuver and use, especially if you’re working for a longer period of time. Furthermore, a heavy lawn leveling rake being too difficult to control may affect the precision of the equipment and, by extension, how your lawn will turn out. Consider your strength, comfort level, and how long you’ll be working for when choosing the weight of your rake, which is of course, decided by your choice of build materials.
- Your Choice of Materials: Your rake’s build material will determine its durability, effectiveness, and longevity, so it is advisable to choose sturdy, durable materials for your rake. Wood and metal are good options. Avoid using lightweight or brittle materials, as they may not hold up well over time.
- Your budget: Consider how much you are willing to spend on materials for your rake. You can make a simple, effective rake using basic materials or invest in higher-quality materials for a more durable tool.
- The angle of the tines: The angle of the rake comb is essential in determining how well it will level your lawn. Aim for an angle between 30 and 45 degrees, allowing the tines to dig into the soil without damaging the grass.
- The length of the tines: It would be best if you also considered the size of the tines. Longer tines can reach deeper into the soil, while shorter tines may be better for more shallow leveling. However, if the tines are too long, they may cause damage to the grass.
- The spacing of the tines: The spacing of the rake fingers is also crucial. If they are too close together, they may not be able to level the lawn effectively. If they are too far apart, they may miss areas or cause damage to the grass. Aim for a spacing of about 1–2 inches between tines.
- The handle: Choose a handle length that is comfortable for you to use. A longer handle may provide more leverage and make it easier to level the lawn. Still, it may also be heavier and harder to maneuver. A shorter handle may be lighter and easier to use but require more effort.
By considering these factors, you can make a lawn leveling tool customized to your needs and help you achieve a smooth, even lawn.
What Tools and Materials Will You Need for a DIY Lawn Leveling Rake?
You’ll need a few essential tools and materials to make a DIY top-dressing rake. Here’s a list of everything you’ll need to begin:
Tools
- Saw
- Drill
- Measuring tape
- Pencil
- Sandpaper
Materials
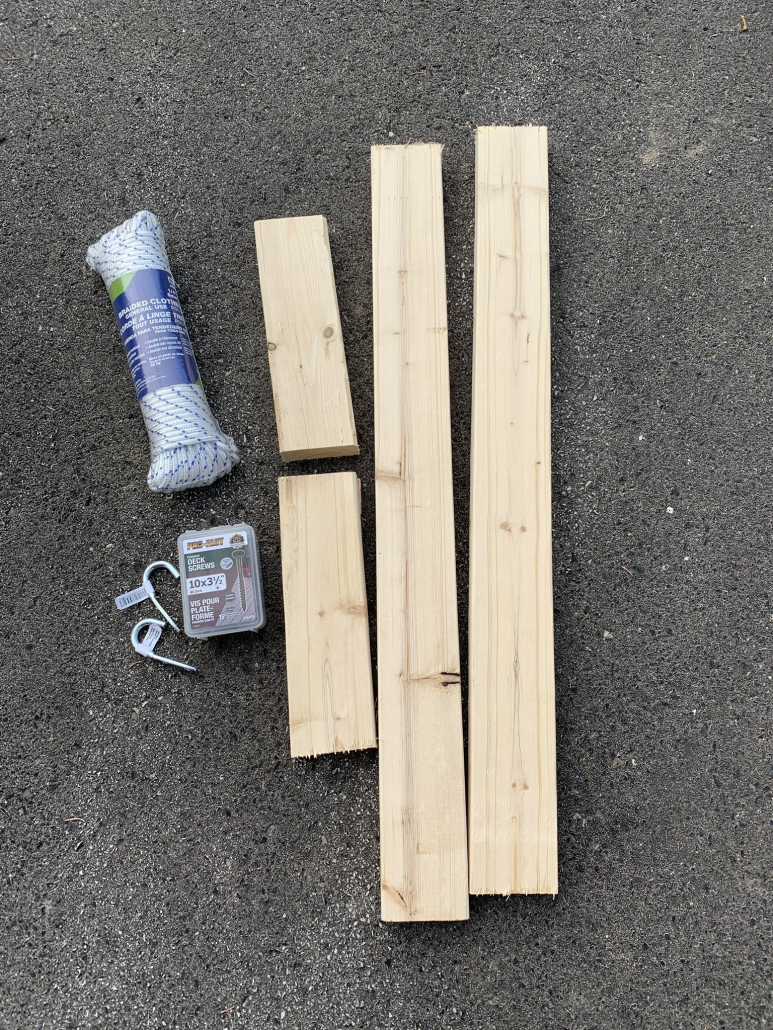
- 2×4 wood board (6 feet long)
- 1×4 wood board (6 feet long)
- 24 metal tines (12 inches long)
- Screws (2.5 inches long)
- Wood finish or paint
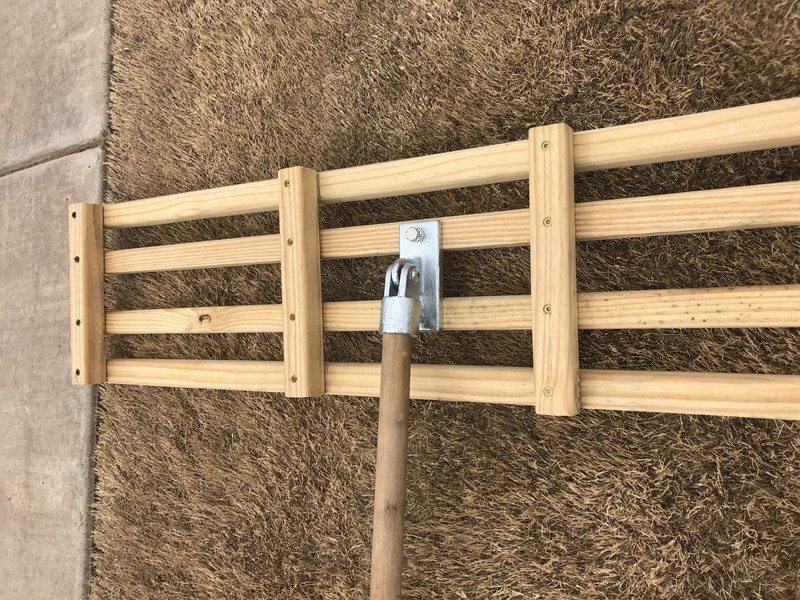
How To Make A Lawn Leveling Rake
Making your top-dressing rake is an affordable and easy way to improve the appearance and health of your lawn. If you’re tired of looking out at your yard and seeing an uneven, bumpy surface, you can make a DIY top dressing rake to solve the problem. Here’s a step-by-step guide to create your grass leveling rake using essential tools and materials.
- Step 1: Cut the Wood Boards
Cut the 2×4 wood board into two pieces, each 3 feet long, using a saw. Then, cut the 1×4 wood board into three parts, each 2 feet long. Ensure the cuts are straight and accurate.
- Step 2: Attach the Tines
Using a measuring tape and pencil, mark the center point of each 2×4 wood board. Then, attach 12 metal tines to each panel, evenly spaced apart. Use a drill to create pilot holes to prevent the wood from splitting, then screw the tines onto the board using 2.5-inch screws.
- Step 3: Attach the Crossbar
Lay the two 3-foot long 2×4 boards parallel, about 2 feet apart. Then, attach the three 2-foot long 1×4 boards at right angles to the 2×4 boards, evenly spaced apart. Drill pilot holes before screwing in the boards, firmly attaching them to the 2×4 boards.
- Step 4: Sand and Finish
Sand the wood boards and tines to remove rough edges or splinters, using sandpaper with medium grit. Then, apply a coat of wood finish or paint to protect the wood from weather damage. Allow the paint or finish to dry completely.
- Step 5: Test It Out
Once the rake is completely dry, it’s time to put it to the test. Spread a mixture of sand and topsoil over your lawn and use your new leveling rake to spread it evenly. Make sure to rake the soil gently so that the tines do not cause any damage to the grass.
In conclusion, making your grass leveling rake is an easy and affordable way to improve the appearance and health of your lawn. With a few essential tools and materials, you can create a leveling rake to help you achieve a smooth, even surface for your yard. Follow these step-by-step instructions, and you’ll be on your way to a beautiful, healthy lawn in no time.
Things to Note When Making a DIY Lawn Leveling Rake
When making a DIY top dressing rake, remember a few essential things to ensure that your rake is practical and durable.
- Choose the right tines: When choosing the metal tines for your rake, ensure that they are sturdy and able to handle the weight of the soil and sand mixture. Also, ensure they are spaced evenly apart to level it off.
- Use quality wood: The wood used for the handle and crossbar should be solid and durable. Pressure-treated wood is a good option as it resists rot and insect damage.
- Ensure accurate measurements: Precise measurements are essential to ensure the rake is balanced and effective. Measure twice and cut once to avoid wasting materials and ensure your rake is proportioned correctly.
- Sand and finish the wood: It smooths out any rough edges or splinters, making it more comfortable to hold and use. Applying a wood finish or paint protects the wood from weather damage and increases its lifespan.
- Test the rake: Before using it on your lawn, test it on a small area to ensure it is effective and won’t damage your grass. Make any necessary adjustments before using it on your entire lawn.
By keeping these things in mind, you can create a durable and practical DIY lawn rake leveler to help you achieve a smooth and even lawn surface.
Conclusion
Congratulations! You now know how to make your lawn rake leveler to achieve a smooth and even lawn without spending a fortune. By considering the size and contour of your yard, the rake’s weight, your choice of materials, the angle, length, and spacing of the tines, and the handle, you can create a custom tool that is comfortable and effective to use.
With some essential tools and materials, such as a saw, drill, measuring tape, metal tines, and wood boards, you can easily make your lawn rake leveler following the simple steps we provided.
Now it’s time to put your new tool to use and enjoy a beautiful, healthy lawn. Happy raking!
Related Articles:
7 Best Lawn Leveling Rakes for Leveling Your Lawn and Yards
How to Use a Lawn Leveling Rake