Surfboard
How to Fix a Surfboard
27
Jul
Jul
Surfboards are intensively used in many western and eastern countries. Everyone wants to enjoy it. Although It is not expensive to rent a board, some people choose to buy a board instead. But as an owner, you may be wondering about how to repair a surfboard if it breaks down suddenly. Today, we will address your concerns in detail.
 Step: 1 Dry the board
To repair the surfboard, first, you’ve to check if the board is dry or not. If the board is not dry, you’ve to dry it for doing repairing. If you use the surfboard in water, you have to dry it to start repairing it because it could not be done on a wet board.
You can dry the board with natural technology like sunlight, but you can also use other unnatural technologies for early drying. But drying for more time will give better results.
Step: 2 Clean the Board
You can’t begin repairing your board until you have great establishments. For instance, before repairing, clean the areas near damaged regions, remove dust or any stickers, and utilize a piece of any wax comb to eliminate the wax, any buildup left close to the damaged areas.
Step: 3 Eliminate the part of broken fiberglass
First, you’ve to clear that the cutting region is clean, then visit the damaged part of fiberglass, eliminate any wrecked fiberglass that is lost or broken; this would give you an ideal solid edge to relation with your upkeep. Use a sharp tool like a knife to clean the damaged region. (It can be precarious with a rough cutting edge). In the last, you’ve to clean the piece of broken fiberglass and any garbage in the damaged area.
Step: 4 Put the solarez
It’s time to fill your board’s damaged areas; while applying solarez, ensure you do this because of direct daylight in a concealed spot; this would show that the tar isn’t set excessively fast. Apply a modest quantity of Solarez straightforwardly onto the dinged region; it goes right in to keep away from any air pocket framing. Attempt and utilize more pitch and ensure every one of the maintenance edges is covered to get a waterproof seal. To assist with halting trickling, use tape or cardboard to help with moving the tar around setup.
When the damaged area is completely covered, the plastic tape compresses the resing down and smooths the top.
Step: 5 Put in direct sunlight
Place the surfboard in the direct sunlight for 4-6 minutes or 12-15 minutes depends upon the region where you’re. If you are in an area where the temperature is above 35 degrees, 4 minutes is enough. While the case with cold countries, it would take 10-15 minutes. The resin will be hardened after some time, but a place in sunlight for a long time can make it better.
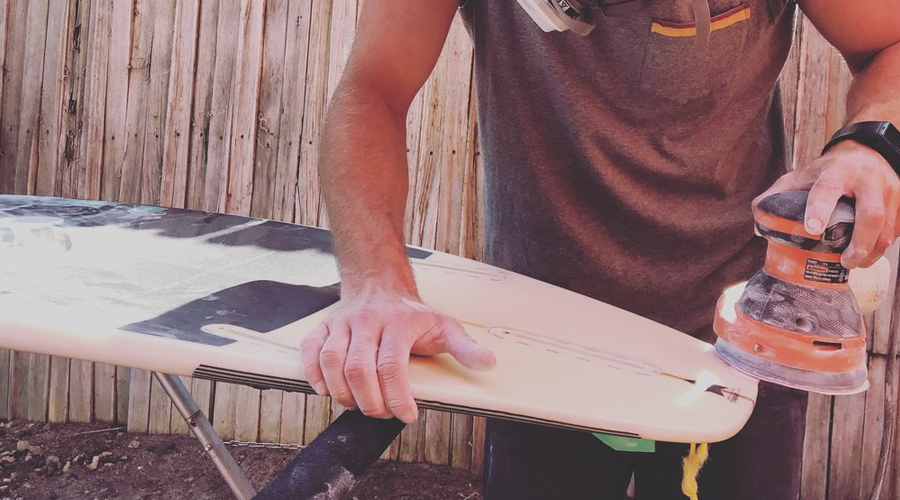
Step: 6 Use sandpaper
At the point when your whole is completely solid, then, at that point, you’ve to take the piece of sandpaper and begin to sand down the overabundance until it’s flush with the heap up. Utilize sandpaper to support with framing the contribute if the ding is a difficult circumstance like in the inner regions. Flat the surface and remove the dust from it.
Step: 7 Cutting the fiberglass cloth
First, we have to cut the piece of fiberglass fabric greater in size than that of your damaged region. You have to cut the piece in the shape of a rectangle or square. A square or circle-shaped cloth provides better stainability. Therefore you must have to cut the fiber cloth in a square- or rectangle-shaped. We will recommend cutting in square-shaped because it looks good.
Step 8: Put in solarez
Before applying the fiberglass cutting cloth, first, you have to utilize your base sheet of solarez to the damaged areas; because of this, the fiberglass can stay with you too. Utilize any wax comb to move pitch around, all over around the fixed region.
Step 9: Put the fiberglass cloth.
Put your cut part of fiberglass on the resin, and afterwards, apply a sheet of resin on the fiberglass to make it wholly immersed and covered. Later the process of dry comes out.
Step 10: Leave the board for dry.
Once we applied the fiberglass completely, first, we have to check that all the damaged area is covered. Afterwards, put in the direct sunlight for 5-8 minutes. If you place it for more than 10 minutes, it would be better. The more the time for dry, give the better result
Step 11: Sand down flat and clean up the region
Since the part is solid, we start the last sanding phases, and your maintenance is almost completed. Utilize the sandpaper similarly as before we use to make it clean and smooth. It’s much not very difficult to uncover the fiberglass. Whenever you have the repair clean and smooth without any lumps, clear all the overabundance dirt with a useless cloth or water, outwardly check it, and ensure that no knots or openings that you have forgotten.
Step: 12 Take a surf
Since you have completed your maintenance, you are fully ready to surf and partake in the waves. This process or surfing is only for testing the board. Remember, it’s a transitory fix and cannot 100 percent keep your board watertight for quite a long time; be that as it may, it should be adequate to get your heap up through many surf sessions.
We discussed some most essential methods while doing repairing the surfboards. There are 11 steps, and you have to keep in mind all these 11 steps. Because without knowing these steps you can’t do the proper repairing the board. This article has also covered the question of how to repair the board. We briefly discuss all the essential factors. By understanding these steps, you can fix the surfboard by yourself. These are the best and easy steps to repair the surfboard.
For the best repairing, it’s consistently a smart thought to counsel your domestic surf shop and fixed the board by a professional mechanic if you are uncertain of how to fix it.
Step: 1 Dry the board
To repair the surfboard, first, you’ve to check if the board is dry or not. If the board is not dry, you’ve to dry it for doing repairing. If you use the surfboard in water, you have to dry it to start repairing it because it could not be done on a wet board.
You can dry the board with natural technology like sunlight, but you can also use other unnatural technologies for early drying. But drying for more time will give better results.
Step: 2 Clean the Board
You can’t begin repairing your board until you have great establishments. For instance, before repairing, clean the areas near damaged regions, remove dust or any stickers, and utilize a piece of any wax comb to eliminate the wax, any buildup left close to the damaged areas.
Step: 3 Eliminate the part of broken fiberglass
First, you’ve to clear that the cutting region is clean, then visit the damaged part of fiberglass, eliminate any wrecked fiberglass that is lost or broken; this would give you an ideal solid edge to relation with your upkeep. Use a sharp tool like a knife to clean the damaged region. (It can be precarious with a rough cutting edge). In the last, you’ve to clean the piece of broken fiberglass and any garbage in the damaged area.
Step: 4 Put the solarez
It’s time to fill your board’s damaged areas; while applying solarez, ensure you do this because of direct daylight in a concealed spot; this would show that the tar isn’t set excessively fast. Apply a modest quantity of Solarez straightforwardly onto the dinged region; it goes right in to keep away from any air pocket framing. Attempt and utilize more pitch and ensure every one of the maintenance edges is covered to get a waterproof seal. To assist with halting trickling, use tape or cardboard to help with moving the tar around setup.
When the damaged area is completely covered, the plastic tape compresses the resing down and smooths the top.
Step: 5 Put in direct sunlight
Place the surfboard in the direct sunlight for 4-6 minutes or 12-15 minutes depends upon the region where you’re. If you are in an area where the temperature is above 35 degrees, 4 minutes is enough. While the case with cold countries, it would take 10-15 minutes. The resin will be hardened after some time, but a place in sunlight for a long time can make it better.
Step: 6 Use sandpaper
At the point when your whole is completely solid, then, at that point, you’ve to take the piece of sandpaper and begin to sand down the overabundance until it’s flush with the heap up. Utilize sandpaper to support with framing the contribute if the ding is a difficult circumstance like in the inner regions. Flat the surface and remove the dust from it.
Step: 7 Cutting the fiberglass cloth
First, we have to cut the piece of fiberglass fabric greater in size than that of your damaged region. You have to cut the piece in the shape of a rectangle or square. A square or circle-shaped cloth provides better stainability. Therefore you must have to cut the fiber cloth in a square- or rectangle-shaped. We will recommend cutting in square-shaped because it looks good.
Step 8: Put in solarez
Before applying the fiberglass cutting cloth, first, you have to utilize your base sheet of solarez to the damaged areas; because of this, the fiberglass can stay with you too. Utilize any wax comb to move pitch around, all over around the fixed region.
Step 9: Put the fiberglass cloth.
Put your cut part of fiberglass on the resin, and afterwards, apply a sheet of resin on the fiberglass to make it wholly immersed and covered. Later the process of dry comes out.
Step 10: Leave the board for dry.
Once we applied the fiberglass completely, first, we have to check that all the damaged area is covered. Afterwards, put in the direct sunlight for 5-8 minutes. If you place it for more than 10 minutes, it would be better. The more the time for dry, give the better result
Step 11: Sand down flat and clean up the region
Since the part is solid, we start the last sanding phases, and your maintenance is almost completed. Utilize the sandpaper similarly as before we use to make it clean and smooth. It’s much not very difficult to uncover the fiberglass. Whenever you have the repair clean and smooth without any lumps, clear all the overabundance dirt with a useless cloth or water, outwardly check it, and ensure that no knots or openings that you have forgotten.
Step: 12 Take a surf
Since you have completed your maintenance, you are fully ready to surf and partake in the waves. This process or surfing is only for testing the board. Remember, it’s a transitory fix and cannot 100 percent keep your board watertight for quite a long time; be that as it may, it should be adequate to get your heap up through many surf sessions.
We discussed some most essential methods while doing repairing the surfboards. There are 11 steps, and you have to keep in mind all these 11 steps. Because without knowing these steps you can’t do the proper repairing the board. This article has also covered the question of how to repair the board. We briefly discuss all the essential factors. By understanding these steps, you can fix the surfboard by yourself. These are the best and easy steps to repair the surfboard.
For the best repairing, it’s consistently a smart thought to counsel your domestic surf shop and fixed the board by a professional mechanic if you are uncertain of how to fix it.
How to do repairing of a surfboard?
As a surfer, it is not enough for you to only enjoy your time spent in the water. You must know about basic surfboard repair, especially with regards to fixing a ding. Dings are usual, particularly if you’re a beginner, albeit experienced surfers, because of everyday use and misuse, need to manage dinged sheets pretty frequently. It’s for each situation extraordinary to acknowledge how to repair the surfboard’s damaged regions, and clean can put your work up to at a record-breaking level. Having a response for making your board waterproof and still at the most raised level that we can do quickly, a flat-out needs to have the surfer’s aptitude. Let’s discuss some essential steps for repairing the surfboard. By understanding these methods, you will be able to fix the surfboard yourself.
Step: 1 Dry the board
To repair the surfboard, first, you’ve to check if the board is dry or not. If the board is not dry, you’ve to dry it for doing repairing. If you use the surfboard in water, you have to dry it to start repairing it because it could not be done on a wet board.
You can dry the board with natural technology like sunlight, but you can also use other unnatural technologies for early drying. But drying for more time will give better results.
Step: 2 Clean the Board
You can’t begin repairing your board until you have great establishments. For instance, before repairing, clean the areas near damaged regions, remove dust or any stickers, and utilize a piece of any wax comb to eliminate the wax, any buildup left close to the damaged areas.
Step: 3 Eliminate the part of broken fiberglass
First, you’ve to clear that the cutting region is clean, then visit the damaged part of fiberglass, eliminate any wrecked fiberglass that is lost or broken; this would give you an ideal solid edge to relation with your upkeep. Use a sharp tool like a knife to clean the damaged region. (It can be precarious with a rough cutting edge). In the last, you’ve to clean the piece of broken fiberglass and any garbage in the damaged area.
Step: 4 Put the solarez
It’s time to fill your board’s damaged areas; while applying solarez, ensure you do this because of direct daylight in a concealed spot; this would show that the tar isn’t set excessively fast. Apply a modest quantity of Solarez straightforwardly onto the dinged region; it goes right in to keep away from any air pocket framing. Attempt and utilize more pitch and ensure every one of the maintenance edges is covered to get a waterproof seal. To assist with halting trickling, use tape or cardboard to help with moving the tar around setup.
When the damaged area is completely covered, the plastic tape compresses the resing down and smooths the top.
Step: 5 Put in direct sunlight
Place the surfboard in the direct sunlight for 4-6 minutes or 12-15 minutes depends upon the region where you’re. If you are in an area where the temperature is above 35 degrees, 4 minutes is enough. While the case with cold countries, it would take 10-15 minutes. The resin will be hardened after some time, but a place in sunlight for a long time can make it better.
Step: 6 Use sandpaper
At the point when your whole is completely solid, then, at that point, you’ve to take the piece of sandpaper and begin to sand down the overabundance until it’s flush with the heap up. Utilize sandpaper to support with framing the contribute if the ding is a difficult circumstance like in the inner regions. Flat the surface and remove the dust from it.
Step: 7 Cutting the fiberglass cloth
First, we have to cut the piece of fiberglass fabric greater in size than that of your damaged region. You have to cut the piece in the shape of a rectangle or square. A square or circle-shaped cloth provides better stainability. Therefore you must have to cut the fiber cloth in a square- or rectangle-shaped. We will recommend cutting in square-shaped because it looks good.
Step 8: Put in solarez
Before applying the fiberglass cutting cloth, first, you have to utilize your base sheet of solarez to the damaged areas; because of this, the fiberglass can stay with you too. Utilize any wax comb to move pitch around, all over around the fixed region.
Step 9: Put the fiberglass cloth.
Put your cut part of fiberglass on the resin, and afterwards, apply a sheet of resin on the fiberglass to make it wholly immersed and covered. Later the process of dry comes out.
Step 10: Leave the board for dry.
Once we applied the fiberglass completely, first, we have to check that all the damaged area is covered. Afterwards, put in the direct sunlight for 5-8 minutes. If you place it for more than 10 minutes, it would be better. The more the time for dry, give the better result
Step 11: Sand down flat and clean up the region
Since the part is solid, we start the last sanding phases, and your maintenance is almost completed. Utilize the sandpaper similarly as before we use to make it clean and smooth. It’s much not very difficult to uncover the fiberglass. Whenever you have the repair clean and smooth without any lumps, clear all the overabundance dirt with a useless cloth or water, outwardly check it, and ensure that no knots or openings that you have forgotten.
Step: 12 Take a surf
Since you have completed your maintenance, you are fully ready to surf and partake in the waves. This process or surfing is only for testing the board. Remember, it’s a transitory fix and cannot 100 percent keep your board watertight for quite a long time; be that as it may, it should be adequate to get your heap up through many surf sessions.
We discussed some most essential methods while doing repairing the surfboards. There are 11 steps, and you have to keep in mind all these 11 steps. Because without knowing these steps you can’t do the proper repairing the board. This article has also covered the question of how to repair the board. We briefly discuss all the essential factors. By understanding these steps, you can fix the surfboard by yourself. These are the best and easy steps to repair the surfboard.
For the best repairing, it’s consistently a smart thought to counsel your domestic surf shop and fixed the board by a professional mechanic if you are uncertain of how to fix it.