dumbbell set
DIY Dumbbell Rack Plans: Learn How to Make One
DIY DUMBBELL RACK plans help organize the dumbbells on your gym floor and make the place look classy at a knockoff price. Regardless of your budgeting plans, or gym size, there’s the right rack plan for you, and we’ll help you find it. When you find the right fit, your gym will look more sophisticated, ultimately helping your gym goals.
Your dumbbell rack plans should be based on the category of weights in your gym. You should also consider the available space in your gym while choosing a dumbbell rack design. Once you have all these in place, all you need to do is get some minimal home equipment and repurposed materials, and you’ll be well on your way to producing a fitting dumbbell rack for your gym.
Too stressful? The high prices of ready-made dumbbell racks might make you think otherwise. Besides, we’re here to help you discover the best plans for your space.
Let’s get to it!
The Best DIY Dumbbell Rack Plans for You
Plan A: for Bench Presses and Dumbbells
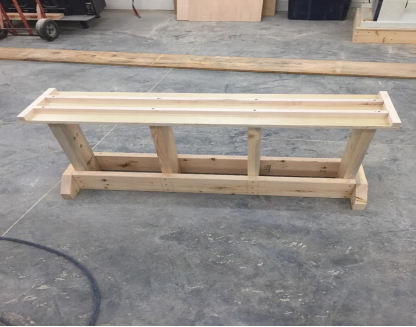
This rack plan is a minimalist approach to organizing your bench presses and dumbbells.
Materials Needed
- Screws
- Plywood (¾ inch, 11” by 43”)
- Wooden Planks (2 by 6”)
Procedures
● Form the Bottom Legs
You can do this using the two by 6” wooden planks. Cut them up into four 22-inch long pieces, and line them up side-by-side horizontally to form a base.
● Form the Bottom Rails
Form the bottom rails by cutting up two 40-inch long 2 x 6”s and placing them on either side of your rack. Then, mark them both 13 inches apart from each other to show the points where you’ll screw in the 22-inch 2 x 6”s.
● Screw them Together
Line the 40 inches on either side and line the 22-inches from the edge to the other edge, 13-inches from each other.
● Stand it up, and Stabilize the rails with another 2 x 6”
Screw this to both ends of the rails to stabilize it.
● Create the Top Rack
Cut the ¾ inch plywood down to 11” x 43”. This will form the top piece. Further, look for two 11-inch long 1” by 1” wood to line this top piece. This will prevent your dumbbells from rolling off. Nail these woods to the plywood you cut out earlier.
● Screw the Top Rack to the Base
Stand the base rails you earlier formed vertically upwards, and screw the just-created top rack.
There’s your weight rack!
Plan B: for Dumbbell Table Desk
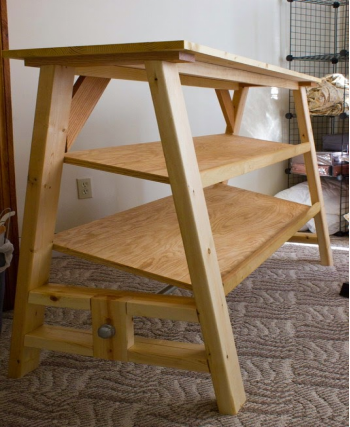
This dumbbell rack plan will come out looking like a desk. It can generally hold more weight and is about the height of a counter. You should consider using this model if you have ample space and plenty of weights and dumbbells.
Materials Needed
- ¾” Plywood sheet
- Three 8-inch long 2 x4” plank
- 6-inch 1 x 4” Plank
- 10-inch 1 x 2” Plank
- Miter Saw
Procedures
A. Form the Legs
You can form the legs using the following steps:
- Bevel the ends of the three 8-inch long 2 x 4” planks
- Cut out the lengths of the legs from the beveled 2 x 4” planks
- Make two sister cuts that have non-parallel edges on these planks.
- You should have four mid-level supports by now. Place them side by side, and mark their centers before clamping them.
- Make a 3 ½” cut at the center using a circular saw. This is to accommodate a 2x 4” wood. Remember, these are your leg supports.
- Now, cut a 14-inch long 1 x 4”, and mark it at 1” from both ends.
- Attach your long legs bent outwards to this 1 x 4” wood. These are your legs, so you should make two of them.
- Place the two legs earlier formed upside down and next to each other. Then, force the supports down the middle till it is balanced and fixed. Do this for the long and short supports.
- After fixing, measure the gaps between the mid-supports, and cut a 2 x 4” of equivalent measurement. Make sure both legs match, and fit the 2 x 4” into the 3 ½” cut earlier made in the supports.
B. Form the Stretchers
Follow these to form the stretchers linking the legs.
- Cut the 1 x 2” of wood into four different pieces of equal lengths, depending on what table size you desire.
- Place the legs side by side, and drill pocket holes on both legs. Attach the stretchers to either side of the table (the legs).
- Attach the remaining stretchers at your desired positions along the length of the legs.
- Measure the frame, and cut the tabletop of the appropriate size. Attach the top with a screw.
C. Attach the Shelves
- Make a slant measurement from underneath the weight stops to the back of the bottom legs.
- Make a cut of corresponding measurements on the plywood sheet.
- Screw the shelves at the different weight stops.
- Stand your rack upright, and you’re done.
- You can decide to add finishes and paints as you see fit.
Summary
There you have it! Two detailed approaches to create your dumbbell rack yourself. You get to get busy, save costs and organize your gym space.
Have at it!