

BEST GROW TENT COLLECTION FOR YOU
What is a grow tent ?
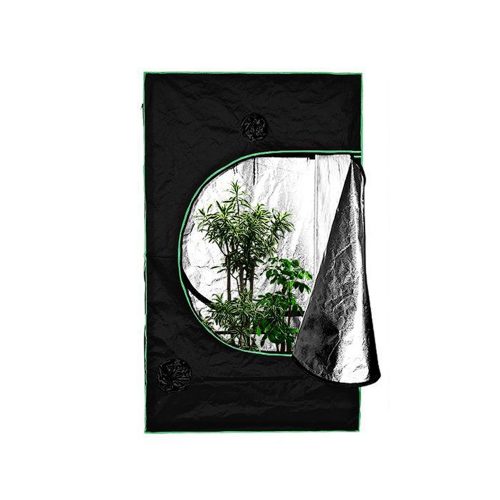
A grow tent is designed to grow plants indoors by controlling climate conditions and the environment. Usually, it is also known as clone tent, plant tent, grow box, indoor grow tent, indoor growing box. Generally speaking, a grow room is waterproof canvas featuring higher durability and light-proofing. A coating provides your plants with warmth and lighting on the interior wall.
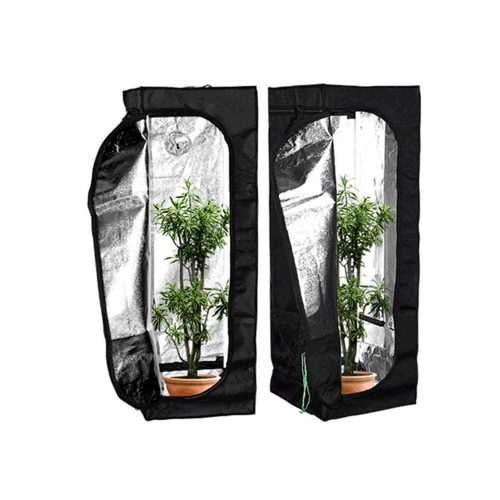
There are different sizes available:
4x4 grow tent/5x5 grow tent/2x4 grow tent/4x8 grow tent/3x3 grow tent/2x2 grow tent / 10x10 grow tent / 2x5 grow tent
If you are trying to get started, the following information may be helpful for you. For experienced and advanced growers, LumBuy helps you gain access to growing tents with hydroponic irrigation systems, ventilation and air movement systems, and the like. You deserve the best grow tent!
How to buy the best grow tent?
Here’s what you need to take into account before buying the best grow tent:
The size of a grow tent depends on how many plants you want to grow in. four-six plants is ideal for giving plants enough space, with two rows of two or three plants.
Height is another primary factor deserving consideration. We often overlook it when trying to grow plants in a small space. The height of your tent brings significant influences to your plants. If the height is suitable, the grow lights are far above the plants and won’t burn them. The extra height will leave more space for ducting, air filters, and fans.
Of course, we should also consider cost, but growing tents with good durability will allow you to use them for a long time.
- Size
The size of a grow tent depends on how many plants you want to grow in. four-six plants is ideal for giving plants enough space, with two rows of two or three plants.
Height is another primary factor deserving consideration. We often overlook it when trying to grow plants in a small space. The height of your tent brings significant influences to your plants. If the height is suitable, the grow lights are far above the plants and won’t burn them. The extra height will leave more space for ducting, air filters, and fans.
- Durability
Of course, we should also consider cost, but growing tents with good durability will allow you to use them for a long time.
- Material
- Dense( 120-600D)
- Heat resistant
- Reflective Coating
- A solid zipper
- Features
- Windows
- Upper and lower ducting vents
- Large door
- Removable floor trays
What are the best brands?
The best brands for sale are DNC, MARS HYDRO, AC Infinity, Spider Farmer, VIVOSUN, Power, and so forth. What's more, there are some other famous and popular brands, such as Gorilla, VIPARSPECTRA, EAGLE PEAK, Giantex, Ohuhu, Quictent and so on. All of these brands are good choices for you.
How to use a grow tent correctly ?
1.Grow Tent
2.Grow Light:
Timer
Power Strips
Hanging Equipment
Hood / Reflector
Ballast
1. Appropriate Ventilation:
Can Fans
Duct clips
Ducting
Carbon Filters
4.Others:
Fasteners and Tape
Plants
Assembly Tools
Temperature and Humidity Gauge
The process of assembling an indoor grow tent includes two essential parts:
1.Assemble the frame
2.Put on the cloth
Now you need to set up fans:
1.Use the right cables
2.Attach the extractor to a frame that will allow you to attach it to the inside of your tent.
3.Attach the frame to the upper bars with clamps or ropes.
For the intake fan, flexible aluminum ducting should be used to get enough fresh air. Ensure it’s in a straight line as much as possible.
Next, it is necessary to set up a carbon filter if you want the entire place free of stinking weed.
1. You can set the filter up until your plants begin to bloom, but it’s easier to set up at the start.
2. If you decide to do it before your plants start to bloom, remove your plants so that you have enough space to install them with ease.
It is almost effortless to set up a carbon filter. Grabbing a meter of ducting and attaching it to the filter's opening with clamps and duct tape, you have finished it without effort.
Then, by using clamps and duct tape again, please attach it to the bars along the indoor grow tent's top and connect the other end of it to the extractor.
To ensure that the stale air doesn’t end up back, you also need to set up the ducting hose from the outside of your extractor fan to a window. Every bend in the ducting means air will be extracted at a slightly slower pace, so you need to try and do it as straight as possible.
Setting up the grow lights is the following step. It is a complex process.
To raise and lower your grow lights, you need to use pulleys such as a chain system or Easy Roller pulleys, which allow you to change the grow lamps' height.
Get a fan and put it in your indoor grow tent. You almost don't need to make efforts to set up a fan. A clip-on fan will be better as it can be attached to the sidebars so that you can make sure that it’s at the right height for your plants. If not, you can get a standing one or use ropes or clamps to string it up if your indoor grow tent is large enough.
Configure your timer, plug it in and connect your lights. Setting up a timer to have the lights turn off and on according to needs will be a good choice, a pretty effortless process.
Last but not least, it is of great importance to make sure that the relative humidity and temperature are proper. Turn your thermos-hygrometer on and place it in the tent. You know the humidity and temperature in real-time.
- Step 1
1.Grow Tent
2.Grow Light:
Timer
Power Strips
Hanging Equipment
Hood / Reflector
Ballast
1. Appropriate Ventilation:
Can Fans
Duct clips
Ducting
Carbon Filters
4.Others:
Fasteners and Tape
Plants
Assembly Tools
Temperature and Humidity Gauge
- Step 2
The process of assembling an indoor grow tent includes two essential parts:
1.Assemble the frame
2.Put on the cloth
- Step 3
Now you need to set up fans:
1.Use the right cables
2.Attach the extractor to a frame that will allow you to attach it to the inside of your tent.
3.Attach the frame to the upper bars with clamps or ropes.
For the intake fan, flexible aluminum ducting should be used to get enough fresh air. Ensure it’s in a straight line as much as possible.
- Step 4
Next, it is necessary to set up a carbon filter if you want the entire place free of stinking weed.
1. You can set the filter up until your plants begin to bloom, but it’s easier to set up at the start.
2. If you decide to do it before your plants start to bloom, remove your plants so that you have enough space to install them with ease.
It is almost effortless to set up a carbon filter. Grabbing a meter of ducting and attaching it to the filter's opening with clamps and duct tape, you have finished it without effort.
Then, by using clamps and duct tape again, please attach it to the bars along the indoor grow tent's top and connect the other end of it to the extractor.
- Step 5
To ensure that the stale air doesn’t end up back, you also need to set up the ducting hose from the outside of your extractor fan to a window. Every bend in the ducting means air will be extracted at a slightly slower pace, so you need to try and do it as straight as possible.
- Step 6
Setting up the grow lights is the following step. It is a complex process.
To raise and lower your grow lights, you need to use pulleys such as a chain system or Easy Roller pulleys, which allow you to change the grow lamps' height.
- Step 7
Get a fan and put it in your indoor grow tent. You almost don't need to make efforts to set up a fan. A clip-on fan will be better as it can be attached to the sidebars so that you can make sure that it’s at the right height for your plants. If not, you can get a standing one or use ropes or clamps to string it up if your indoor grow tent is large enough.
- Step 8
Configure your timer, plug it in and connect your lights. Setting up a timer to have the lights turn off and on according to needs will be a good choice, a pretty effortless process.
- Step 9
Last but not least, it is of great importance to make sure that the relative humidity and temperature are proper. Turn your thermos-hygrometer on and place it in the tent. You know the humidity and temperature in real-time.
Why choose LumBuy?
LumBuy is an e-commerce company that focuses on high-quality products. We have the strictest supplier selection criteria and will only select 5-star products with an excellent reputation, where you can shop with confidence and buy the best products.
How to control temperature and humidity in grow tent?
2.Turn on the air conditioner
3.Add CO2 to the indoor grow tent
4.Create an icebox (with ice or dry ice)
5.Ensure the inline fan is good enough
6.Use LED Grow Lights instead of HPS / HID Grow Lights
7.Locate grow light drivers outside the indoor grow tent
8.Place hydroponic equipment outside the indoor grow tent
Vegetation stage: Rh 40%-60%
Flowering stage: Rh 35%-50%
Harvesting/drying stage: 30%-40%
2.Get a thermostatically controlled block heater
3.Boost the Ventilation Up
4.Make use of an air conditioner
5.Remove the Plant Leaves
2.Choose the right size of AC unit
3.Keep your grow space away from outside humidity
4.Don’t rely on one-dimensional ventilation
5.Deduce exposed water surfaces
6.Pay attention to your humidity level
- How to control the temperature in grow tent?
2.Turn on the air conditioner
3.Add CO2 to the indoor grow tent
4.Create an icebox (with ice or dry ice)
5.Ensure the inline fan is good enough
6.Use LED Grow Lights instead of HPS / HID Grow Lights
7.Locate grow light drivers outside the indoor grow tent
8.Place hydroponic equipment outside the indoor grow tent
- How to control humidity in an indoor grow tent?
- The right humidity levels for different stages of growth
Vegetation stage: Rh 40%-60%
Flowering stage: Rh 35%-50%
Harvesting/drying stage: 30%-40%
- Ways to control humidity
2.Get a thermostatically controlled block heater
3.Boost the Ventilation Up
4.Make use of an air conditioner
5.Remove the Plant Leaves
- Things to do to skirt Further Raise in Humidity
2.Choose the right size of AC unit
3.Keep your grow space away from outside humidity
4.Don’t rely on one-dimensional ventilation
5.Deduce exposed water surfaces
6.Pay attention to your humidity level
How to set up a fan and carbon filter in grow tent?
1.Attach and adjust hangers
First of all, you need to attach the hangers along thetent ceiling's support bar. Attach them to the length that the fan will be hung. But keep in mind, don’t hang too low as hot air often stays at the tent's top.
2.Attach zip ties
Put metal brackets or zip ties on the tent fan's attachment area and connect them to hangers.
3.Ducting
Connect ducting to the indoor grow tent fan's output side, wrap metal brackets or zip ties near ducting and connect them to hangers.
4.Carbon filter
Connect carbon filter to the indoor grow tent fan's intake side that absorbs air. You can use ducting in between or connect it to the fan. Use provided clamp or zip tie.
5.Run ducting
Run the ducting through your tent's opening. Secure the duct sleeve tightly around the fan ducting.
How many plants can you grow in a grow tent?
The number and size of plants exert influences on yield. Overcrowding plants will lead to a poor yield. So how many plants can you grow in an indoor grow tent?
Speaking of the exact number of plants, a variety of factors should be considered, including:
Generally speaking, 1 – 4 plants per square meter is the correct number.
Speaking of the exact number of plants, a variety of factors should be considered, including:
- Your plants' size
- Grow lights
- The number of the tools in the tent
Generally speaking, 1 – 4 plants per square meter is the correct number.
- Size of tent / Number of plants
- 0.75m x 0.75m / 1– 2 plants
- 1.00m x 1.00m / 1– 3 plants
- 1.20m x 1.20m (XL) / 1 – 4 plants
- 1.00m x 1.50m / 1 – 4 plants
- 1.20m x 2.40m (XXL) / 2 – 8 plants
- 1.50m x 1.50m / 2 – 6 plants
- 1.50m x 2.00m / 2 – 8 plants
- 1.50m x 3.00m / 4 – 12 plants
- 1.00m x 3.00m / 3 – 9 plants
- 2.00m x 2.00m / 4 – 12 plants
- 2.00m x 3.00m / 4 – 16 plants
- 2.40m x 2.40m / 4 – 16 plants
- 3.60m x 2.40m / 6 – 24 plants
- 3.00m x 3.00m / 6 – 24 plants
- 6.00m x 3.00m / 12 – 48 plants